Giving AI The Keys to Your App: Agents Controlling UI State

The crucial part of this project is moving the flow and logic responsibility outside the React component, and letting agents control the UI state autonomously.

Ever since learning about agents and workflows, I have been asking myself how I can seamlessly integrate those AI features into an application. So, after brainstorming, I came up with the idea of making a small game in which AI agents are the participants.

The game is rooted in the trolley problem, a well-known ethical thought experiment, where the train is coming to a junction and has to be directed to the left or right side. There are possible casualties on both sides, each of them tied to moral implications. In this version of the game, AI agents are responsible for presenting the case to the judge agent to spare their side of the tracks, so you can be sure that nobody was harmed.

Creating UI

The UI is very simple, so instead of going through the steps of writing it, I’ll show you how it ended up looking and explain the idea behind connecting it to its AI brain. The UI is written in React using shadcn/ui as a components library to speed up the process.
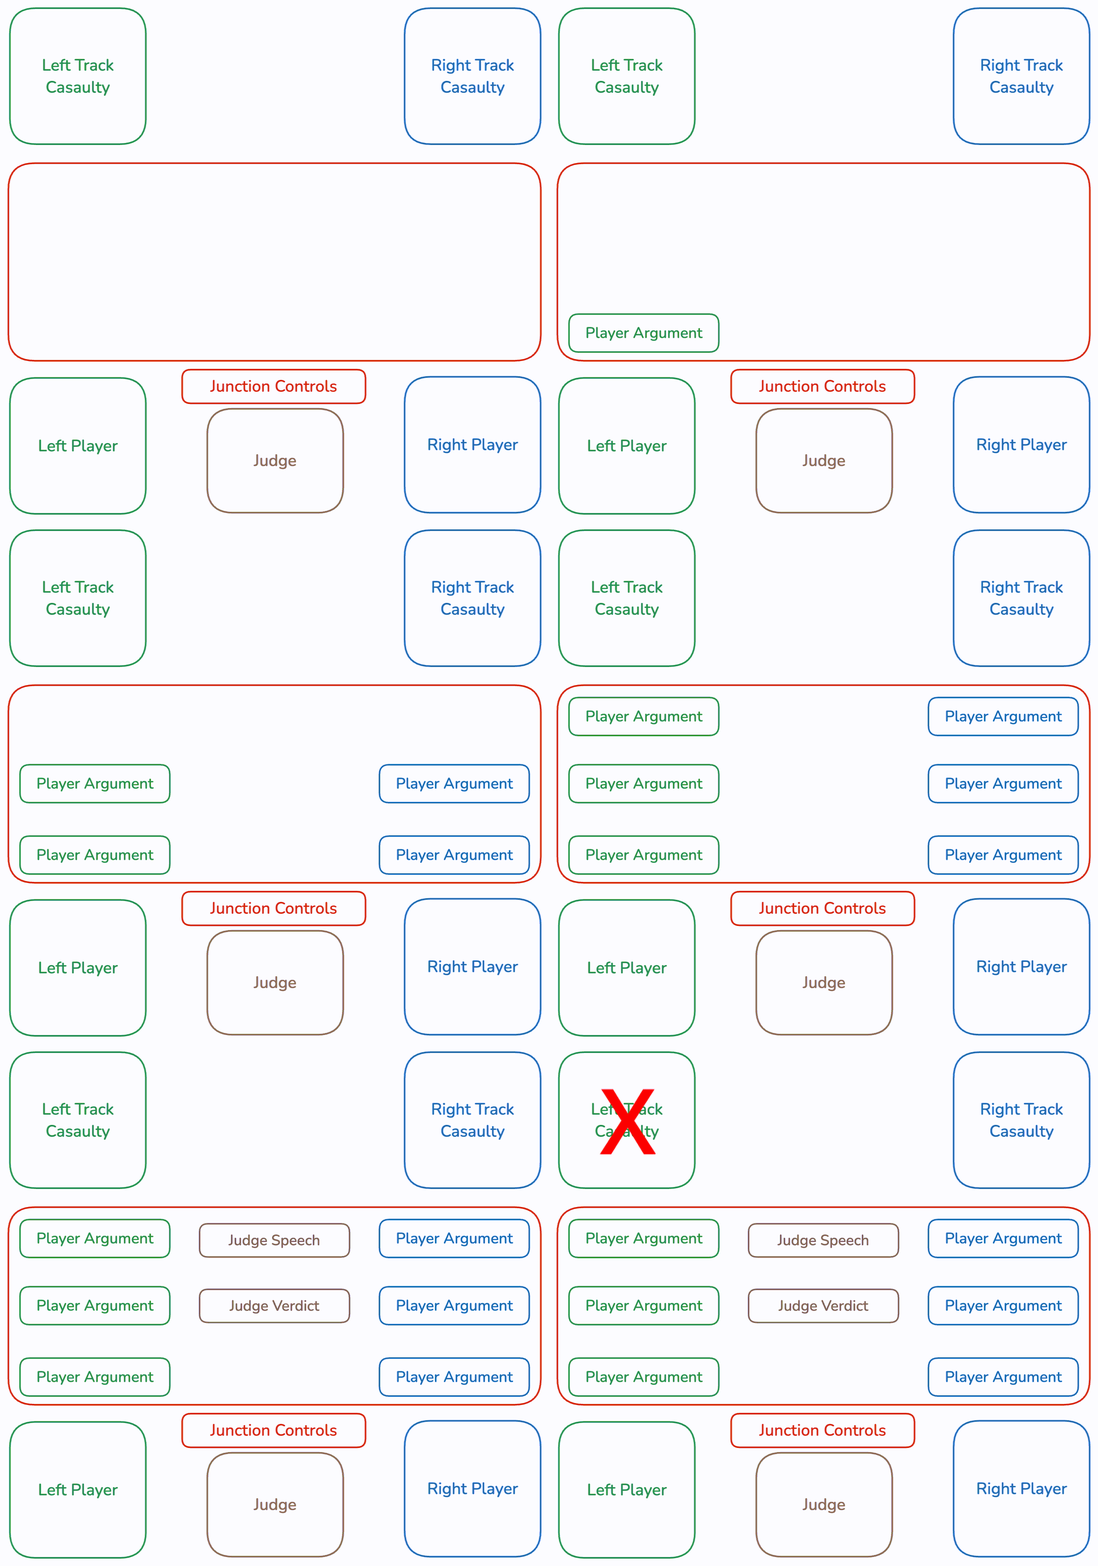
Simplified UI and animation flow

There are three main sections: victims, debate, and players.

Preparing state

The most important part was to get away from any internal state and move that responsibility outside of React so all the components are only communicating with the external state. My favorite tool is Jotai Atom, but any other state management library will work fine as well. After that, I set up a custom “Store” for the atoms so they could be modified outside the React render tree.

export const rightPlayerSpeechAtom = atom<string[]>([])
export const leftPlayerSpeechAtom = atom<string[]>([])
export const conductorDecisionAtom = atom<Decision>("none")
export const conductorSpeechAtom = atom<string[]>([])
export const gameStateAtom = atom<GameState>("stopped")
export const gameStore = createStore();
view raw playersAtoms.ts hosted with ❤ by GitHub
<Provider store={gameStore}>
<CasaultiesSection />
<DebateSection />
<PlayersSection />
</Provider>
view raw app.tsx hosted with ❤ by GitHub

With that setup, let’s shift the focus to the AI part.

Creating agents

The main AI libraries this project will use are flows-ai and vercel/ai. Flows-ai provides a set of utilities and helpers to speed up agents' creation and compose them into reusable and serializable flows. This means that once we figure out the game flow and create agents, we can quickly try out different configurations without writing any complex loops or conditions. Let’s start with the main judge agent, as their logic will be singular, independent of the side.

export const prepareJudge = () => {
return agent({
model: openai('gpt-4o'),
system: getJudgeSystemPrompt(),
});
};
view raw judge.ts hosted with ❤ by GitHub

In the simplest form, that is an agent able to run in the flow. But we also need to give it the ability to modify the state of the UI.

const decide = tool({
parameters: z.object({
final_speech: z.string(),
verdict_announcement: z.string(),
verdict: z.enum(['left', 'right']),
}),
execute: async ({
final_speech,
verdict_announcement,
verdict,
}) => {
gameStore.set(judgerSpeechAtom, (speech) => [
...speech,
verdict_announcement,
]);
await dramaticPause(3);
gameStore.set(judgerSpeechAtom, (speech) => [
...speech,
verdict_announcement,
]);
gameStore.set(judgeDecisionAtom, verdict);
return `You have decided. Good job.`;
},
}),
view raw decide_tool.ts hosted with ❤ by GitHub

Here is the tool that allows the agent to announce the verdict, and show it on the screen. It even allows for a short dramatic pause after the final speech (very suspenseful). Now that we have that function, let’s put all those parts together into the agent.

export const prepareJudge = () => {
return agent({
model: openai('gpt-4o'),
system: getJudgeSystemPrompt(),
toolChoice: 'required',
maxSteps: 1,
tools: {
decide
}
});
};
view raw judge.ts hosted with ❤ by GitHub

In this step, it’s important to make the judge use the tool instead of just returning a response without taking any action. The judge will get information about the arguments and possible casualties in the prompt when the flow is running, so for now, it’s ready. Time for the players!

Each player needs to be able to plead their case, so the argument will be visible. It also needs to be aware of the previously provided arguments, to not use the same ones over and over. To achieve that, let’s take advantage of the flexibility of flows-ai.

type PlayerAgentProps = Parameters<typeof generateText>[0] & {
playerContextAtom: PrimitiveAtom<string[]>;
};
function makePlayerAgent({
maxSteps = 2,
playerContextAtom,
...rest
}: PlayerAgentProps): Agent {
return async ({ input }) => {
const playerContext = gameStore.get(playerContextAtom);
const response = await generateText({
...rest,
maxSteps,
prompt: s`
Here are your current arguments:
${playerContext.join('\n')}
Round number: ${JSON.stringify(input)}
`,
});
gameStore.set(playerContextAtom, (speech) => [...speech, response.text]);
await dramaticPause(5);
return response.text;
};
}
view raw players.ts hosted with ❤ by GitHub

After making sure that the function returns an agent that conforms to the interface that flows-ai expects, we can now pass the “outside” state into the agent context and modify the state after we get the response. Now that the main agent can access and modify the state, let’s abstract away the creation of its personality.

export const preparePlayer = ({
playerDescriptionAtom,
playerSpeechAtom,
playerVictimDescriptionAtom,
oponentVictimDescriptionAtom,
}: PlayerProps) => {
const playerDescription = gameStore.get(playerDescriptionAtom);
const playerVictim = gameStore.get(playerVictimDescriptionAtom);
const oponentVictim = gameStore.get(oponentVictimDescriptionAtom);
return makePlayerAgent({
playerContextAtom: playerSpeechAtom,
model: openai('gpt-4o'),
system: getPlayerSystemPrompt(playerDescription, playerCasaulty, oponentCasaulty)
});
};
view raw players.ts hosted with ❤ by GitHub

It looks like all the AI participants are ready. Let’s finish up the project by creating an easily modifiable game flow!

Creating flows

Let’s start simple, by establishing the initial flow of one argument for each player and a verdict.

const flow = sequence(
[
parallel([
{
agent: "leftPlayerAgent",
name: "Left Player",
input: "Give your argument"
},
{
agent: "rightPlayerAgent",
name: "Right Player",
input: "Give your argument"
}
]),
{
agent: 'judgeAgent',
name: 'Judge Speech',
input: 'Make your decision based on provided arguments!',
},
],
'Game Flow',
);
view raw flow.ts hosted with ❤ by GitHub

Now we have a flow that will run a sequence. The first step is running player agents in parallel (because time is of the essence here). Then, the results are taken and given as context to the judge agent, which is the second step of the sequence. With that flow out of the way, let’s create the agents and run the flow.

execute(flow, {
model: openai('gpt-4o'),
agents: {
leftPlayerAgent,
rightPlayerAgent,
judgeAgent,
},
});
view raw flow.ts hosted with ❤ by GitHub

That’s it! Now our players will display their arguments on the screen, add their responses as a context for the judge, and the judge will give the final verdict.

Now that I have shown that flows-ai is easy to set up, let me also show you that it’s flexible. Let’s start by making it more exciting by providing three arguments each instead of just one.

const setupRounds = (roundsAmount: number) => {
return sequence(
new Array(roundsAmount).fill(0).map((_, index) => {
return parallel(
[
{
agent: 'leftPlayerAgent',
name: 'leftPlayer',
input: `#${index + 1}`,
},
{
agent: 'rightPlayerAgent',
name: 'rightPlayer',
input: `#${index + 1}`,
},
],
`Round ${index + 1}`,
);
}),
`Players Argumenting Phase`,
);
};
const flow = sequence(
[
setupRounds(3),
{
agent: 'judgeAgent',
name: 'Judge Speech',
input: 'Make your decision based on provided arguments!',
},
],
'Game Flow',
);
view raw flow.ts hosted with ❤ by GitHub

Since flows-ai is fully serializable, it is very easy to create helper functions for modifying the flow. In that scenario, our players have context passed through atoms, but if they didn’t have atoms, they would still receive their previous responses as “context”.

So, with that one easy change, we now implement three steps for arguments, and after them, the judge makes the final call. But what about showing buttons to control the game or the overall game state? We can also modify the execution of the flow to be even more flexible.

execute(flow, {
model: openai('gpt-4o'),
agents: {
leftPlayerAgent,
rightPlayerAgent,
judgeAgent,
},
onFlowStart: (flow) => {
if (flow.name === 'Players Argumenting Phase') {
gameStore.set(judgeStateAtom, 'listening');
}
if (flow.name === 'Judge Speech') {
gameStore.set(judgeStateAtom, 'deciding');
}
},
onFlowFinish: (flow) => {
if (flow.name === 'Players Argumenting Phase') {
gameStore.set(judgeStateAtom, 'thinking');
}
if (flow.name === 'Judge Speech') {
gameStore.set(judgeStateAtom, 'done');
gameStore.set(gameStateAtom, 'finished');
}
},
});
view raw flow.ts hosted with ❤ by GitHub

Thanks to the fact that each flow has its own separate name, we can make a couple of simple “ifs” to control and react to each step of the flow. The “ifs” can be as granular or as complex as needed.

In the end, I introduced a couple of small name changes and improvements to the UI, but here is the final result:

Final app UI

You can fetch the repo and play with it by yourself. There are plenty of amazing flows that you can easily implement with flows-ai. It integrates seamlessly with Vercel’s AI library, so push your imagination to the extreme, and have fun with it!


Insights

Learn more about AI

Building a Software Factory: Write Specs an Agent Can Build From — cover

Nov 6Article

Building a Software Factory: Write Specs an Agent Can Build From

Learn how to research requirements, resolve open decisions, and write testable specs that AI coding agents can implement without the planning conversation.

 Large-Scale Migrations With Coding Agents: Planning, Verification, and Rollback — cover

Nov 4Article

Large-Scale Migrations With Coding Agents: Planning, Verification, and Rollback

Plan codebase migrations with coding agents using reviewable requirements, verification checks, staged rollouts, and defined rollback criteria.

Conversational Banking: From Customer Questions to Authorized Actions — cover

Nov 2Article

Conversational Banking: From Customer Questions to Authorized Actions

Explore conversational banking architecture through a card-dispute example, covering tool access, authorization, execution, observability, and human handoff.

Building a Software Factory: The Night My Agents Waited for Me — cover

Oct 28Article

Building a Software Factory: The Night My Agents Waited for Me

Learn how permissions, review limits, and missing product decisions stalled two overnight coding agent runs, and how their maintainer revised the workflow.

Your AI Coding Agent Still Needs an Architecture — cover

Oct 22Article

Your AI Coding Agent Still Needs an Architecture

Use explicit contracts, behavior tests, and dependency checks to guide AI coding agents and review their changes through a TypeScript favorites example.

cover

Oct 15Live Stream

Who Left the Agents Running? React Native Software Factories

Join Kewin Wereszczyński and Szymon Chmal to explore what can go wrong in a React Native software factory overnight and the controls that keep agents on track.

cover

Oct 14Podcast

When Coding Gets Faster, What Breaks Next?

Matt Hargett explains how AI moves bottlenecks across testing, deployment, infrastructure, support, and the rest of software delivery.

cover

Oct 12Podcast

AI Coding Agents and Hermes With Tzvetan Mikov

Tzvetan Mikov discusses AI coding agents, context switching, low-level engine optimization, reviewing specs and tests, and his plans for Hermes X.

cover

Oct 12Podcast

State Machines for AI Agents With David Khourshid

David Khourshid explains state machines for AI agents, human approval steps, tracing, and handling invalid model outputs in agent workflows.

cover

Oct 9Article

How to Maximize AI SDLC? Measure the Outer Business Loop, Not the Inner Developer Loop

Connect AI-assisted development to measurable business outcomes. Matt Hargett shares a checklist for assessing user exposure, results, and delivery costs.

cover

Oct 7Talk

Automating Mobile QA with Cloud Agents

Michał Pierzchała shows how cloud-based QA agents can test real iOS and Android user flows and bring screenshots, recordings, and logs into pull requests.

cover

Oct 1Live Stream

Can Jev Make AI Agent Decisions Faster?

Explore Jev with Kewin Wereszczyński and Szymon Chmal: how it works, its approach to faster agent decisions, and possible local alternatives.

cover

Mar 19Tutorial

The Hard Way vs. The React Native AI SDK Way: Stop Writing Custom Modules for Every Model

Learn how React Native AI uses a unified provider model to switch between cloud and on-device LLMs without rewriting application logic, enabling reliable AI experiences online and offline.

cover

Mar 12Tutorial

Build Smarter Apps: Tool Calling & AI Orchestration Explained

Learn how on-device models in React Native can call tools, interact with external APIs, and return structured outputs you can use directly in application logic.

cover

Mar 5Tutorial

MLC LLM + React Native: On-Device AI Without the Pain

Learn how to run third-party on-device LLMs in React Native using MLC LLM. Choose your models, run them efficiently across platforms, and keep a unified JavaScript API with React Native AI.

cover

Feb 24Tutorial

Intelligent Fallbacks with Apple Intelligence in React Native

Learn how to use Apple’s built-in Foundation Models in React Native apps, reduce memory usage, and enable fast, fully on-device AI with React Native AI Apple.

cover

Feb 10Tutorial

What Is the React Native AI SDK? A Complete Intro & Quickstart

Learn why on-device AI matters for React Native apps, how local LLMs behave offline, and what problems React Native AI is designed to solve from day one.

cover

Jan 29Tutorial

Implementing an Android TurboModule with Kotlin

Learn how to implement a React Native TurboModule on Android, from the TypeScript spec and Codegen to the Kotlin implementation and package registration.

cover

Jan 19Tutorial

Working with Different Threads in Swift TurboModules

Learn how JavaScript, native module, background, and main threads interact in React Native TurboModules, and how to use GCD queues to run async work safely in Swift.

cover

Jan 9Tutorial

How to Add Type-Safe Constants to Swift TurboModules

Learn how to expose typed, immutable constants from a Swift TurboModule using Codegen, and get full end-to-end type safety between native and JavaScript.

cover

Dec 30Tutorial

Adding Event Emitters to Your TurboModule in Swift

Learn how to emit native events from a Swift TurboModule and subscribe to them in JavaScript, including proper memory management and Codegen integration.

cover

Dec 22Tutorial

Writing Your First TurboModule in Swift

Learn how to build a fully working TurboModule in Swift, integrate it with Codegen, and bridge it through Objective‑C inside an Expo app.