Build Modern Web3 dApps on Ethereum With React Native and Viem

The web3 space is evolving quickly, with new applications, tools, and protocols always emerging. Staking and lending assets for yield, shared social networks, and interchangeable items between totally separate games are just a few examples of the latest trends.

Innovation is constantly ongoing, and so are the tools being used to build these products. If you have ever tried to build decentralized apps (dApps) on the web, you probably have stumbled upon web3.js or ethers.js, two cornerstones of developing web3 apps in JavaScript. They both act as low-level libraries to interact with the blockchain, which means, Ethereum blockchain nodes running either locally on your computer or remotely on a server. The communication is done via the JSON-RPC protocol.

On top of those, many other libraries and frameworks arose using them as a foundation, to the point that now we have a diverse pool of tooling at our disposal, which we can use to build amazing decentralized apps and wallets.

Web3 libraries and React Native

The issue is that the majority of web3 libraries were built with their primary focus on the web, starting from the browser wallet extensions that use window.ethereum injected in the global namespace as its primary form of exposing the API. 

Most tools that don't work well with React Native usually share the same reason: they rely on Node.js or browser APIs. Understandably, they might need that crypto module to perform hashing operations, or converting strings between base64 and binary with btoa and atob.

When talking about React and Ethereum, you may have heard of viem and WalletConnect. They both triumph on the web, but what about React Native? That's what we’ll be exploring in this post.

What is viem?

According to their docs:

viem is a TypeScript interface for Ethereum that provides low-level stateless primitives for interacting with Ethereum.

So viem is a newer alternative to web3.js and ethers.js. It also enables you to talk to the Ethereum RPC servers through their simplified API on top of the JSON-RPC protocol, similarly to the others, so we're able to query or modify data into the blockchain. 

Viem was born to address the issues the latter two suffer from: stability, bundle size, performance and developer experience - issues already well-discussed in the community.

According to BundlePhobia, and checking the latest versions available now, viem weights 62.7kB minified + gzipped, while ethers.js weights 135.9kB and web3.js weights 152.4kB. When importing analog core features, with tree-shaking, viem can get 2 to 5 times smaller than the alternatives.

viem bundle size
Source: https://viem.sh/docs/introduction.html#bundle-size

Regarding performance, viem also claims to beat the alternatives by at least 40 times in core operations like isAddress. Read more in the performance section.

viem performance chart
Source: https://viem.sh/docs/introduction.html#performance

And it has been quickly gaining traction as we can see in this graph from NPM Trends:

graph showing viem npm trends
Source: https://npmtrends.com/ethers-vs-viem-vs-web3

What is WalletConnect?

WalletConnect is an open protocol that allows dApps to interact securely with mobile wallets. It enables users to connect their wallets to dApps by scanning a QR code or clicking on a deep link. Once connected, dApps can send transaction requests to the wallet, and the wallet prompts the user for approval before signing and broadcasting the transactions.

WalletConnect is the actual standard for connecting wallets in Ethereum apps, and with v2 it is expanding to become chain-agnostic. One of its biggest advantages is being supported by dozens (hundreds?) of wallets, hence it is more attractive than integrating several wallet SDKs separately.

Also, the WalletConnect SDKs provide easy-to-use APIs and a plug-and-play UI to choose the wallet that best suits you. It is supported by MetaMask, Rainbow Wallet, Trust Wallet, Coinbase Wallet, Safe Wallet, and many others. The probability that the wallet you're using is supported by them is very high.

walletconnect screen with QR code
Source: https://walletconnect.com/products

In WalletConnect v2.0, a chain-agnostic interface was implemented, and now WalletConnect can support multiple chains besides Ethereum. To understand more about the differences in v2.0, check Pedro Gomes's post on the topic.

Building a dApp in React Native

If you want to check the final code by yourself, here's the repository.

Requirements

  • Expo environment setup (Node.js, Git, Watchman)
  • A Wallet Connect Cloud project ID
  • Expo Go app installed in your smartphone
  • One or more web3 wallets installed in your smartphone (e.g. MetaMask, Rainbow Wallet, Trust Wallet, etc.)

Creating a new Expo app

Start by creating a new Expo app:

npx create-expo-app my-fancy-dapp

Then immediately rename the App.js file to App.tsx. Expo will know we're trying to use TypeScript and will ask to install the dependencies when you try to run the app.

Run the development server, and if everything is working correctly you should have a blank app:

npm start
New blank Expo app

Querying data from the blockchain

Now, install viem:

npm install viem

viem needs a simple polyfill for the EcmaScript TextEncoder API, which you can easily install by running the command below. For more information, see Platform Compatibility.

npm install fastestsmallesttextencoderdecoder

We need to apply the polyfill as the first thing when running our app. So, to keep things organized, let's create a new polyfills.ts file that will hold all our polyfills, in case more are needed later:

import 'fastestsmallesttextencoderdecoder'
view raw polyfills.ts hosted with ❤ by GitHub

And on App.tsx, import the polyfills in the first line:

import './polyfills'
import { StatusBar } from 'expo-status-bar';
import { StyleSheet, Text, View } from 'react-native';
...
view raw App.tsx hosted with ❤ by GitHub

With viem and the polyfills installed, we're now able to interact with the blockchain data. On App.tsx, create a public client above the App component:

import './polyfills'
import { StatusBar } from 'expo-status-bar';
import { StyleSheet, Text, View } from 'react-native';
import {createPublicClient, http} from "viem";
import {mainnet} from "viem/chains";
const publicClient = createPublicClient({
chain: mainnet,
transport: http(),
})
export default function App() {
...
}
view raw App.tsx hosted with ❤ by GitHub

We’ll use the public client to send requests to the RPC server running an Ethereum node. Here we have configured it saying that we're targeting Ethereum mainnet, and will do it through http, but if needed, you could choose to use polygon (or any other chain), as well as communicating through WebSockets or a custom EIP-1193 compatible provider (we’ll see more about this later).

With the public client set up, it's just a matter of calling the right methods and putting in the state so we can visualize.

Create the state variables that are gonna hold our values. viem will return the values as BigInt, so we initialise them with 0n:

const [blockNumber, setBlockNumber] = useState(0n)
const [gasPrice, setGasPrice] = useState(0n)
view raw App.tsx hosted with ❤ by GitHub

In an useEffect, fetch the network data on mount:

useEffect(() => {
const getNetworkData = async () => {
const [blockNumber, gasPrice] = await Promise.all([
publicClient.getBlockNumber(),
publicClient.getGasPrice(),
])
setBlockNumber(blockNumber)
setGasPrice(gasPrice)
}
getNetworkData();
}, []);
view raw App.tsx hosted with ❤ by GitHub

Then, show them on the screen:

import {createPublicClient, formatEther, http} from "viem";
...
return (
<View style={styles.container}>
<Text>Block number: {String(blockNumber)}</Text>
<Text>Gas price: {formatEther(gasPrice)} ETH </Text>
</View>
);
view raw App.tsx hosted with ❤ by GitHub

viem responses will always return in wei, which is the smallest unit in Ethereum, and equivalent to 10^-18 ETH. To transform to ETH, we use the formatEther utility.

And ta-da! You should now have your app looking somewhat like this, with real data coming directly from the blockchain.

App querying block number and gas price from the blockchain

Interacting with your wallet

Now, you probably want to connect your wallet, to be able to display your address, sign messages, send transactions and other actions that require wallet permissions.

To support as many wallets as possible (and consequently as many users as possible), we'll use WalletConnect's WalletConnectModal. This is an advanced SDK from WalletConnect for more granular control. At the time of writing, it is currently their only production-ready React Native-compatible SDK, since they just announced the alpha version of Web3Modal SDK for React Native. We’ll cover this one in a future blog post.

WalletConnectModal, as the name says, will open a nice-looking modal UI for the users to select their preferred wallet among several options. Upon selecting, the user should be deep-linked to the wallet app, asking for permission to connect.

Installing WalletConnectModal

Run this to install the WalletConnectModal SDK:

npx expo install @walletconnect/modal-react-native

Then, install the other dependencies and polyfills:

npx expo install @react-native-async-storage/async-storage react-native-get-random-values react-native-modal react-native-svg @react-native-community/netinfo

Optionally, for iOS, you may want to specify wallets to detect automatically in case the user already has them installed, to show them first. You can do it by adding the wallet schemes under the iOS configuration in app.json:

{
"expo": {
"ios": {
"bundleIdentifier": "com.your.app",
"infoPlist": {
"LSApplicationQueriesSchemes": [
"metamask",
"trust",
"safe",
"rainbow",
"uniswap",
// Add other wallet schemes names here
]
}
}
}
}
view raw app.json hosted with ❤ by GitHub

For more info, or if you're using a different version of Expo, please refer to the WalletConnectModal docs.

Using WalletConnectModal

The setup is done, now let's move to the actual use.

At the top of App.tsx, add your projectId and providerMetadata:

const projectId = 'YOUR_PROJECT_ID'
const providerMetadata = {
name: 'Example dApp',
description: 'Modern Example dApp from Callstack',
url: 'https://callstack.com/',
icons: ['https://example.com/'],
redirect: {
native: 'YOUR_APP_SCHEME://',
universal: 'YOUR_APP_UNIVERSAL_LINK.com'
}
}
view raw App.tsx hosted with ❤ by GitHub

If you don't have a projectId yet, you’ll need to go to WalletConnect Cloud and create an account and project. The project ID will be in the project's settings page.

For providerMetadata, use whatever values best describe your project. The values at the redirect field should represent your app's scheme, for Deep Links, and link, for Universal Links.

To be able to interact with the modal, we’ll call the useWalletConnectModal() hook, at the beginning of the App component:

import {useWalletConnectModal} from "@walletconnect/modal-react-native";
...
const { open, isConnected, provider, address: wcAddress } = useWalletConnectModal()
view raw App.tsx hosted with ❤ by GitHub

This provides us with a lot of useful information:

  • open: method to programmatically open the modal
  • isConnected: straightforward, boolean
  • provider: an EIP-1193 compliant provider, a standard for consistency between Ethereum wallets and applications
  • address: the connected wallet's address

The provider is the instance that actually sends requests to the RPC server and listens for events. We won't be using it directly though, we’ll pass it to viem so we can leverage viem's higher-level abstractions.

Now render the modal component, and a Button to open it:

import {useWalletConnectModal, WalletConnectModal} from "@walletconnect/modal-react-native";
...
return (
<View style={styles.container}>
<Text>Block number: {String(blockNumber)}</Text>
<Text>Gas price: {formatEther(gasPrice)} ETH </Text>
<Button title="Connect Wallet" onPress={() => open()}/>
<WalletConnectModal projectId={projectId} providerMetadata={providerMetadata}/>
</View>
);
view raw App.tsx hosted with ❤ by GitHub

At this point, you should have something like this:

WalletConnectModal opened to select a wallet

Connecting and disconnecting

To connect, it's just a matter of opening modal and choosing the desired wallet, and the connected address will be available through the useWalletConnectModal() hook. To please TypeScript, we’ll re-declare the address variable, since the address returned from the hook is a string, and viem will always consume a more sophisticated 0x${string}.

import {Address, createPublicClient, formatEther, http} from "viem";
...
const [blockNumber, setBlockNumber] = useState(0n)
const [gasPrice, setGasPrice] = useState(0n)
const { open, isConnected, provider, address: wcAddress } = useWalletConnectModal()
const address = wcAddress as Address | undefined;
view raw App.tsx hosted with ❤ by GitHub

We can update our UI to show the address when isConnected is true, and also add a button to disconnect:

return (
<View style={styles.container}>
<Text numberOfLines={1}>Block number: {String(blockNumber)}</Text>
<Text numberOfLines={1}>Gas price: {formatEther(gasPrice)} ETH</Text>
{isConnected && (
<View style={styles.block}>
<Text numberOfLines={1}>Address: {address}</Text>
</View>
)}
<View style={styles.block}>
{isConnected ? (
<Button
title="Disconnect"
onPress={() => provider?.disconnect()}
color="red"
/>
) : (
<Button title="Connect" onPress={() => open()} />
)}
</View>
<WalletConnectModal projectId={projectId} providerMetadata={providerMetadata}/>
</View>
);
view raw App.tsx hosted with ❤ by GitHub
const styles = StyleSheet.create({
container: {
flex: 1,
alignItems: 'center',
justifyContent: 'center',
marginHorizontal: 20,
},
block: {
marginTop: 32,
},
});
view raw App.tsx hosted with ❤ by GitHub

Notice how we can disconnect just by calling provider?.disconnect().

Now, your app should be working similarly to this:

Connecting a wallet

Setting up listeners

We want to know when the app has connected connect event) so we can show the address, balance, and chain. We also want to know if the user manually changed chains directly via their wallet (chainChanged event), to show and hide elements, or block and unblock features.

Start by adding a CHAINS constant outside the component, the list of chains that are going to be supported by our dApp. This will allow us to find the chain object easily when switching chains.

import { mainnet, sepolia } from 'viem/chains';
const CHAINS = [mainnet, sepolia];
view raw App.tsx hosted with ❤ by GitHub

Then, we’ll need a second useEffect to register listeners:

import {IProvider, useWalletConnectModal, WalletConnectModal} from "@walletconnect/modal-react-native";
...
useEffect(() => {
const onChainChangedEvent = (chainId: string) => {
const chain = CHAINS.find(chain => chain.id === Number(chainId)) ?? CHAINS[0];
setChain(chain);
};
const onConnectEvent = async ({ session }: { session: IProvider['session'] }) => {
// Need to do some massaging to get the actual chainId from the connect event
const chainId = session?.namespaces.eip155.chains?.[0].replace('eip155:', '');
if (chainId) {
onChainChangedEvent(chainId);
}
if (address) {
const balance = await publicClient.getBalance({ address });
setBalance(balance);
}
};
// Exported types for the `connect` event seem to be wrong, so we need to ignore here
// @ts-ignore
provider?.on('connect', onConnectEvent);
provider?.on('chainChanged', onChainChangedEvent);
return () => {
provider?.removeListener('chainChanged', onChainChangedEvent);
provider?.removeListener('connect', onConnectEvent);
};
}, [address, provider]);
view raw App.tsx hosted with ❤ by GitHub
  • When the chain changes, we get a chainId. We search for the chain with this id in the CHAINS constant, and set it in the state
  • When the app connects, we extract the chainId from the event, and reuse the same method from when the chain changes, to keep the chain updated. Then, we also get the wallet balance with the getBalance function, and set it in the state

Now, add 2 new state variables to keep track of the current chain and balance :

import {Address, Chain, createPublicClient, formatEther, http} from "viem";
...
const [blockNumber, setBlockNumber] = useState(0n)
const [gasPrice, setGasPrice] = useState(0n)
const { open, isConnected, provider, address: wcAddress } = useWalletConnectModal()
const address = wcAddress as Address | undefined;
const [chain, setChain] = useState<Chain>(CHAINS[0]);
const [balance, setBalance] = useState(0n);
view raw App.tsx hosted with ❤ by GitHub

And update the UI again to show these values:

return (
<View style={styles.container}>
<Text numberOfLines={1}>Block number: {String(blockNumber)}</Text>
<Text numberOfLines={1}>Gas price: {formatEther(gasPrice)} ETH</Text>
{isConnected && (
<View style={styles.block}>
<Text numberOfLines={1}>Address: {address}</Text>
<Text numberOfLines={1}>Balance: {formatEther(balance)} ETH</Text>
<Text>Connected to: {chain.name}</Text>
</View>
)}
<View style={styles.block}>
{isConnected ? (
<Button
title="Disconnect"
onPress={() => provider?.disconnect()}
color="red"
/>
) : (
<Button title="Connect" onPress={() => open()} />
)}
</View>
<WalletConnectModal projectId={projectId} providerMetadata={providerMetadata}/>
</View>
);
view raw App.tsx hosted with ❤ by GitHub

With the above setup, we already have our UI updated when connecting a wallet or switching chains, nice!

You can test that by manually switching chains in your wallet, and seeing it reflect in the dApp UI:

Manually switching chains in wallet, and reacting in the app UI

Signing a message

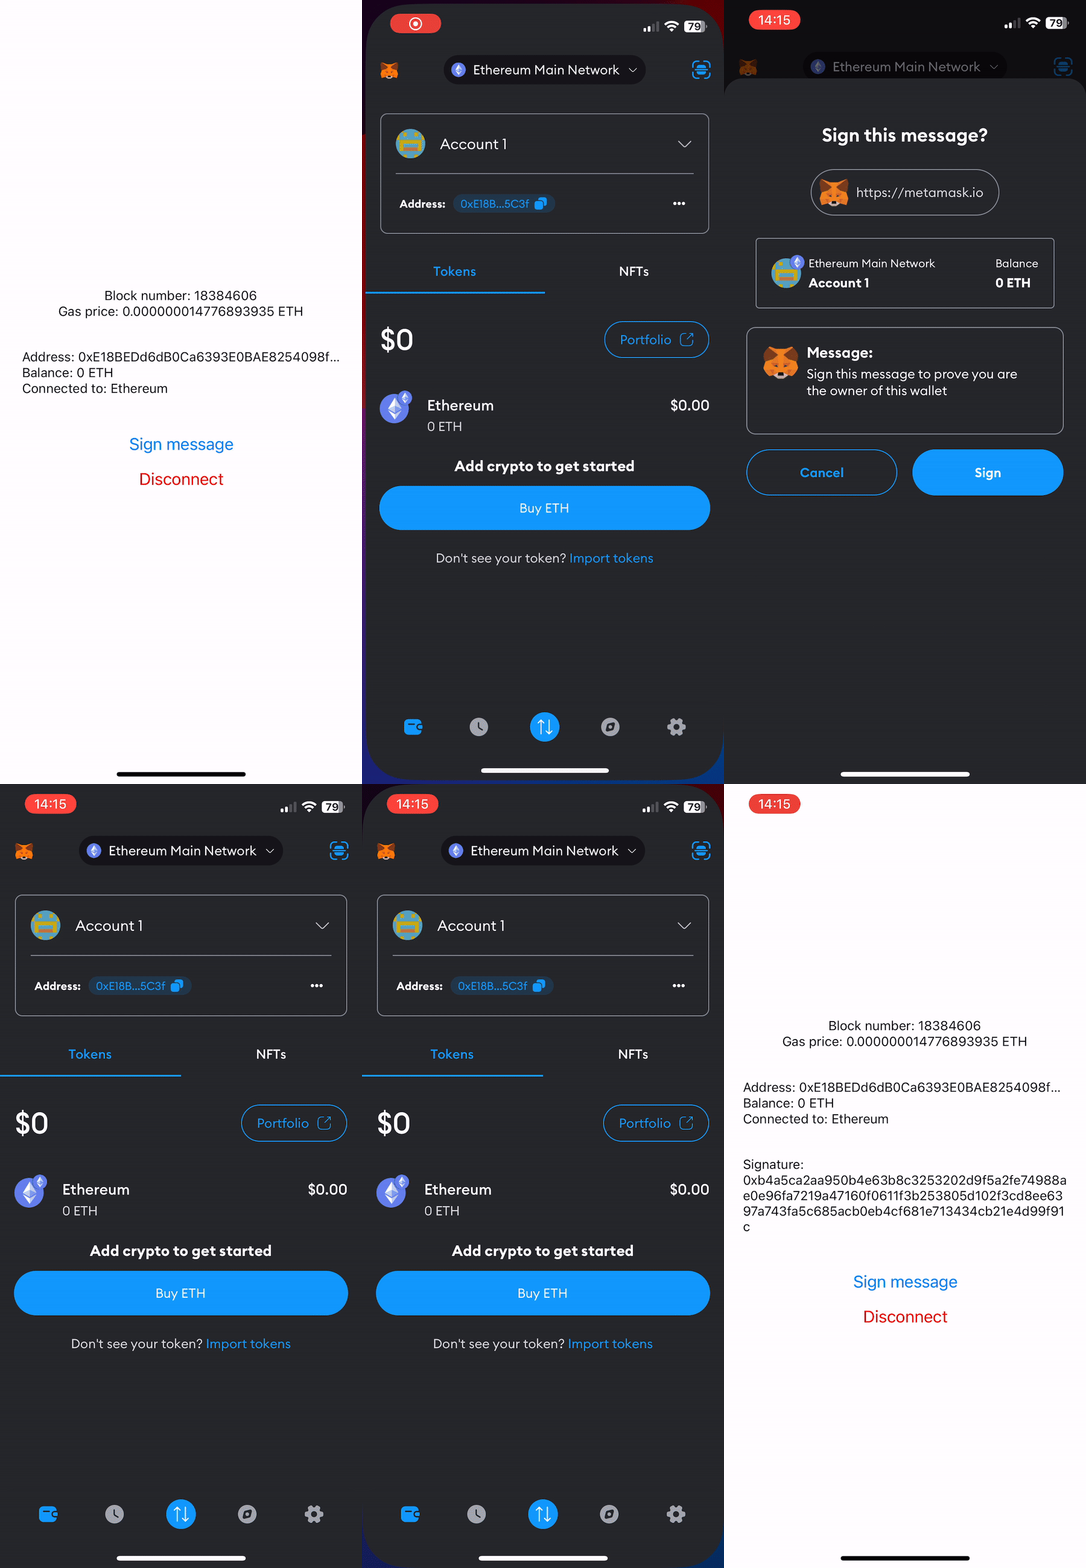
Wrapping everything up, let's use our wallet to sign a message, and prove that we're its actual owners.

We’ll create the wallet client and a signature state. The former is similar to the public client we created before, but it has access to the provider and is able to request permissions to the wallet. The latter will hold the signature hash proof.

import {Address, Chain, createPublicClient, createWalletClient, custom, formatEther, http} from "viem";
...
const [blockNumber, setBlockNumber] = useState(0n)
const [gasPrice, setGasPrice] = useState(0n)
const { open, isConnected, provider, address: wcAddress } = useWalletConnectModal()
const address = wcAddress as Address | undefined;
const [chain, setChain] = useState<Chain>(CHAINS[0]);
const [balance, setBalance] = useState(0n);
const [signature, setSignature] = useState<`0x${string}`>();
const walletClient = useMemo(() =>
createWalletClient({
chain: mainnet,
transport: custom({
async request({ method, params }) {
return await provider?.request({ method, params });
},
}),
}),
[provider],
);
view raw App.tsx hosted with ❤ by GitHub

It's important to memoize the wallet client, since it depends on the provider that comes from the WalletConnect modal hook, and we don't want it being recreated (and messing with our session), when the component re-renders.

Now, let's add a handler that will request the wallet to sign a message when called:

const onSignMessage = async () => {
if (address) {
const signature = await walletClient.signMessage({
account: address,
message: 'Sign this message to prove you are the owner of this wallet',
});
setSignature(signature);
}
};
view raw App.tsx hosted with ❤ by GitHub

We call viem's walletClient.signMessage(), passing our address and the message we want to sign. This message will be displayed in the wallet's UI, and wait for the user to confirm. If confirmed, we’ll have a cryptographic signature, which we'll display in the UI just for presentation purposes.

Finally, let's update our UI with a Button to call the onSignMessage handler, and a Text to show the signature proof.

You should end with something that looks like this:

return (
<View style={styles.container}>
<Text numberOfLines={1}>Block number: {String(blockNumber)}</Text>
<Text numberOfLines={1}>Gas price: {formatEther(gasPrice)} ETH</Text>
{isConnected && (
<View style={styles.block}>
<Text numberOfLines={1}>Address: {address}</Text>
<Text numberOfLines={1}>Balance: {formatEther(balance)} ETH</Text>
<Text>Connected to: {chain.name}</Text>
{signature && (
<View style={styles.block}>
<Text>Signature: {signature}</Text>
</View>
)}
</View>
)}
<View style={styles.block}>
{isConnected ? (
<>
<Button title="Sign message" onPress={onSignMessage} />
<Button
title="Disconnect"
onPress={() => provider?.disconnect()}
color="red"
/>
</>
) : (
<Button title="Connect" onPress={() => open()} />
)}
</View>
<WalletConnectModal projectId={projectId} providerMetadata={providerMetadata}/>
</View>
);
view raw App.tsx hosted with ❤ by GitHub

…and works like this:

Signing a message

Summary

To sum things up, the classic libraries are still there and are still going to work. If you're constrained to it, better enjoy it, knowing that you can still build great applications.

But for the modern JavaScript way, there is viem, the cool new kid in town that brings enhanced performance, a smaller footprint, and better DX. Pair it with the WalletConnect solutions and you have a great stack to build any front-end to your smart contracts.

The web3 space is still too young, especially when it comes to React Native.

All the code shown in this guide is available publicly on GitHub.

Insights

Learn more about Web3

Event Cover

Apr 5Talk

Build Universal Web3 Apps With React Native

Learn how to use React Native to build true cross-platform experiences (iOS, Android and Web) for your decentralized apps, from a single codebase.

cover

Mar 13Article

The Mini Guide to React Native Optimization for Web3

Explore the essential strategies for optimizing React Native apps in the web3 landscape with this insightful mini-guide. Enhance stability, security, and UX.

cover

Mar 6Article

Increase Speed and Security With Native Crypto Libraries

Boost speed and security in React Native with native crypto libraries. Uncover browser or Node.js API polyfill drawbacks, and find efficient solutions.

cover

Jan 12Article

How to Build Universal Lens Protocol Social Apps With React Native

Unlock the potential of web3 social apps with Lens Protocol on the Polygon blockchain. Learn how to build a universal social network app using React Native.

cover

Dec 28Article

Cross-Platform Web3 dApps With React Native

Discover the power of cross-platform development with React Native and Expo in this guide. Learn to build Web3 dApps for web, iOS, and Android.

cover

Nov 14Podcast

Building the Future of Mobile Web3

Do Web3 and React Native go together? Tune in to our discussion about the possibilities & challenges of building cross-platform mobile apps with blockchain.

cover

Nov 13Article

Best DX for React Native Web3 dApps With Web3Modal and Wagmi

Unsatisfied with developer experience of developing for Ethereum? Learn how to build a React Native dApp using Wagmi and Web3Modal.

cover

Mar 19Tutorial

The Hard Way vs. The React Native AI SDK Way: Stop Writing Custom Modules for Every Model

Learn how React Native AI uses a unified provider model to switch between cloud and on-device LLMs without rewriting application logic, enabling reliable AI experiences online and offline.

cover

Mar 12Tutorial

Build Smarter Apps: Tool Calling & AI Orchestration Explained

Learn how on-device models in React Native can call tools, interact with external APIs, and return structured outputs you can use directly in application logic.

cover

Mar 5Tutorial

MLC LLM + React Native: On-Device AI Without the Pain

Learn how to run third-party on-device LLMs in React Native using MLC LLM. Choose your models, run them efficiently across platforms, and keep a unified JavaScript API with React Native AI.

cover

Feb 24Tutorial

Intelligent Fallbacks with Apple Intelligence in React Native

Learn how to use Apple’s built-in Foundation Models in React Native apps, reduce memory usage, and enable fast, fully on-device AI with React Native AI Apple.

cover

Feb 10Tutorial

What Is the React Native AI SDK? A Complete Intro & Quickstart

Learn why on-device AI matters for React Native apps, how local LLMs behave offline, and what problems React Native AI is designed to solve from day one.

cover

Jan 29Tutorial

Implementing an Android TurboModule with Kotlin

Learn how to implement a React Native TurboModule on Android, from the TypeScript spec and Codegen to the Kotlin implementation and package registration.

cover

Jan 19Tutorial

Working with Different Threads in Swift TurboModules

Learn how JavaScript, native module, background, and main threads interact in React Native TurboModules, and how to use GCD queues to run async work safely in Swift.

cover

Jan 9Tutorial

How to Add Type-Safe Constants to Swift TurboModules

Learn how to expose typed, immutable constants from a Swift TurboModule using Codegen, and get full end-to-end type safety between native and JavaScript.

cover

Dec 30Tutorial

Adding Event Emitters to Your TurboModule in Swift

Learn how to emit native events from a Swift TurboModule and subscribe to them in JavaScript, including proper memory management and Codegen integration.

cover

Dec 22Tutorial

Writing Your First TurboModule in Swift

Learn how to build a fully working TurboModule in Swift, integrate it with Codegen, and bridge it through Objective‑C inside an Expo app.