Exposing SwiftUI Views to React Native: An Integration Guide

Authors
Oskar Kwaśniewski
Software Developer
@
Callstack

Since its release in 2019, SwiftUI's been shifting our approach to writing iOS apps from imperative to declarative, bringing us closer to React. Now, 6 years later, SwiftUI is used in many apps in production, with Apple increasingly releasing SwiftUI-exclusive APIs, underscoring its strategic direction.

In this blog post, we will explore how you can integrate SwiftUI views within your React Native components, demonstrating how to expose SubscriptionStoreView to the React Native app to create a neat paywall with just a few lines of SwiftUI code.

Note: This blog post assumes you have prior knowledge of SwiftUI and native development.

Setup for embedding SwiftUI views in React Native

To get started with embedding SwiftUI views in React Native, create a new library. The easiest way to do so is to use react-native-builder-bob:

npx create-react-native-library@latest SwiftUIStoreView
view raw terminal.sh hosted with ❤ by GitHub

In the library type, let’s choose Fabric View:

Choosing FabricView in library type

Next, navigate to the example folder, install pods, and launch the project in Xcode. After opening the project, navigate to Pods > Development Pods > SwiftUIStoreView in the sidebar.

As you can see, there are already three files created for us by Bob. The SwiftUIStoreViewViewManager.mm file is used by the old architecture, while SwiftUIStoreViewView.h and SwiftUIStoreViewView.mm are used by the new one.

Creating SwiftUI components

Let’s start by creating two new Swift files. The first one will be the SwiftUI implementation, which will know nothing about React Native. The second one will create a bridge between our native implementation and SwiftUI. Let’s call them SwiftUIStoreView.swift and SwiftUIStoreViewProvider.swift respectively.

After adding the files, remember to update the .podspec file to include .swift in our sources.

s.source_files = "ios/**/*.{h,m,mm,cpp,swift}"

Following this change, reinstall Cocoapods. If you notice an error compiling about Swift not being able to build the Objective-C module “SwiftUIStoreView”, add #ifdef __cplusplus and #endif in the header file:

#ifdef __cplusplus
#import <React/RCTViewComponentView.h>
#import <UIKit/UIKit.h>
#ifndef SwiftUIStoreViewViewNativeComponent_h
#define SwiftUIStoreViewViewNativeComponent_h
NS_ASSUME_NONNULL_BEGIN
@interface SwiftUIStoreViewView : RCTViewComponentView
@end
NS_ASSUME_NONNULL_END
#endif /* SwiftUIStoreViewViewNativeComponent_h */
#endif /* __cplusplus */

Next, let’s implement SwiftUIStoreView, which will use StoreKit’s built-in view, SubscriptionStoreView:

import SwiftUI
import StoreKit
class Props: ObservableObject {
@Published var productIDs: [String] = []
}
struct SwiftUIStoreView: View {
@ObservedObject var props: Props
var body: some View {
if #available(iOS 17.0, *) {
SubscriptionStoreView(productIDs: props.productIDs)
}
}
}

Let’s break down what’s happening in the code snippet above.

First, we created a new SwiftUI view as usual, checking if we are running iOS 17 because this is the version where this API has been introduced (normally, you should bump your development target or provide a fallback for older versions).

Then, we used ObservableObject to create a class called Props, which will be used by our provider class to bridge React Native and SwiftUI. Every time we change a property inside the ObservableObject, our view will re-render with new data (same as React!).

If you are targeting iOS 17+, there is a newer alternative available: Observable macro.

Connecting SwiftUI with React Native

To connect SwiftUI with React Native, let’s create the provider class (SwiftUIStoreProvider):

import UIKit
import React
import SwiftUI
@objc public class StoreViewProvider: UIView {
private var props = Props()
private var hostingController: UIHostingController<SwiftUIStoreView>?
public override func layoutSubviews() {
super.layoutSubviews()
setupView()
}
private func setupView() {
if self.hostingController != nil {
return
}
self.hostingController = UIHostingController(
rootView: SwiftUIStoreView(
props: props
)
)
if let hostingController = self.hostingController {
addSubview(hostingController.view)
hostingController.view.translatesAutoresizingMaskIntoConstraints = false
hostingController.view.pinEdges(to: self)
reactAddController(toClosestParent: hostingController)
}
}
}
extension UIView {
func pinEdges(to other: UIView) {
NSLayoutConstraint.activate([
leadingAnchor.constraint(equalTo: other.leadingAnchor),
trailingAnchor.constraint(equalTo: other.trailingAnchor),
topAnchor.constraint(equalTo: other.topAnchor),
bottomAnchor.constraint(equalTo: other.bottomAnchor)
])
}
}

We’ve just created a new class that’s exposed to Objective-C using @objc annotation. Inside it, we create a new instance of the Props class that will be used to communicate with the SwiftUI view.

Then, we use the built-in UIHostingController that allows us to embed SwiftUI inside the UIKit view. The setup of creating a new UIHostingController , together with the SwiftUI view, can be found inside the setupView method. To embed a view controller inside another one, we have to use view controller containment, which can be achieved by a utility method from React Native called reactAddController(toClosestParent:).

We also use Auto Layout to pin the edges of the SwiftUI view to the edges of the provider view. The size of the provider view will be then dictated by React Native, specifically Yoga.

Here is how it looks on a diagram:

The structure of our SwiftUI React Native integration

Last but not least, we have to use the view inside our Objective-C file. As a first step, add the import of Swift classes. The compiler automatically generates <Module_Name>-Swift.h header files so we can easily interop between Swift and Objective-C.

Let’s add this import on the top of the file:

#if __has_include("SwiftUIStoreView/SwiftUIStoreView-Swift.h")
#import "SwiftUIStoreView/SwiftUIStoreView-Swift.h"
#else
#import "SwiftUIStoreView-Swift.h"
#endif

In the snippet above, we’ve checked whether we are running in the Frameworks mode (either static or dynamic), where imports are prefixed with the module name. Otherwise, we would use a normal import.

Next, in the @implementation block, let’s change UIView to our custom view:

@implementation SwiftUIStoreViewView {
StoreViewProvider* _view;
}

And then, in the initializer, we create an instance of StoreViewProvider:

- (instancetype)initWithFrame:(CGRect)frame
{
if (self = [super initWithFrame:frame]) {
static const auto defaultProps = std::make_shared<const SwiftUIStoreViewViewProps>();
_props = defaultProps;
_view = [[StoreViewProvider alloc] init];
self.contentView = _view;
}
return self;
}

If you want your library to support New Architecture, use the above import and return a new instance of StoreViewProvider in the ViewManager file related to old architecture:

@interface SwiftUIStoreViewViewManager : RCTViewManager
@end
@implementation SwiftUIStoreViewViewManager
RCT_EXPORT_MODULE(SwiftUIStoreViewView)
- (UIView *)view
{
return [[StoreViewProvider alloc] init];
}
@end

In React Native, make sure that your view takes the whole available space by assigning it the proper styles:

import { StyleSheet } from 'react-native';
import { SwiftUIStoreViewView } from 'swiftui-store-view';
export default function App() {
return (
<SwiftUIStoreViewView style={styles.container} />
);
}
const styles = StyleSheet.create({
container: {
flex: 1,
width: '100%',
height: '100%',
},
});
view raw App.tsx hosted with ❤ by GitHub

After compiling the app, you’ll see a spinner with a “Loading Subscription” label:

Loading subscription label

That’s because we haven’t specified StoreKit product IDs yet! To achieve this, we first have to allow users of our custom view to pass props from React. The TypeScript Codegen spec describes our component’s interface, which is later used to generate native interfaces.

Now, let’s add a new property in your spec:

interface NativeProps extends ViewProps {
productIDs: string[]; // <- productIds
}
export default codegenNativeComponent<NativeProps>('SwiftUIStoreViewView');

Next, we need to reinstall pods, which will re-run React Native Codegen. After that, let’s navigate to the SwiftUIStoreViewView.mm file and change the updateProps function to look like this:

- (void)updateProps:(Props::Shared const &)props oldProps:(Props::Shared const &)oldProps
{
const auto &oldViewProps = *std::static_pointer_cast<SwiftUIStoreViewViewProps const>(_props);
const auto &newViewProps = *std::static_pointer_cast<SwiftUIStoreViewViewProps const>(props);
if (oldViewProps.productIDs != newViewProps.productIDs) {
NSMutableArray *productIds = [[NSMutableArray alloc] initWithCapacity:newViewProps.productIDs.size()];
for (auto &productId : newViewProps.productIDs) {
[productIds addObject:[NSString stringWithUTF8String:productId.c_str()]];
}
_view.productIDs = productIds;
}
[super updateProps:props oldProps:oldProps];
}

Now, we must compare old and new props and then convert C++ collection type std::vector<std::string> to Objective-C’s NSArray<NSString *>. To do so, we need to iterate over the vector and append new products to the NSArray.

Additionally, we have to add a new property accessible by Objective-C in our SwiftUIStoreViewProvider:

@objc public class StoreViewProvider: UIView {
// ...
@objc public var productIDs: [String] = [] {
didSet {
props.productIDs = productIDs
}
}
}

The productIDs property uses the didSet mechanism in Swift, which updates the productIDs property on the Props class created earlier. The update of the props object triggers a re-render on the SwiftUI side.

For old architecture, use RCT_EXPORT_VIEW_PROPERTY:

@interface SwiftUIStoreViewViewManager : RCTViewManager
@end
@implementation SwiftUIStoreViewViewManager
/...
RCT_EXPORT_VIEW_PROPERTY(productIDs, NSArray<NSString *>)
@end

After passing some dummy productIDs on the React side, you should see SwiftUI showing an error screen indicating that subscription is not available because we didn’t pass proper product identifiers from StoreKit.

<SwiftUIStoreViewView style={styles.storeView} productIDs={["Test"]} />
view raw App.tsx hosted with ❤ by GitHub
Subscription unavailable

Testing with StoreKit Configuration

Let’s create a StoreKit configuration file to test if your view works properly! In Xcode, create a new file from the template and select “StoreKit Configuration File”. After creating the file, add new subscriptions by clicking the “plus” button in the bottom left corner.

StoreKit Configuration File

If you want to learn more about StoreKit Configuration, check out this blog post.

One last thing to do before we can test this is to tell Xcode to use this StoreKit file. Click on your App Scheme > Edit Scheme:

App Scheme > Edit Scheme

In the Options tab, choose the recently created StoreKit configuration file:

recently created StoreKit configuration file

Next, update the productIDs in App.tsx:

const productIDs = ["com.swiftui.montly.storeview", "com.swiftui.yearly.storeview"];
export default function App() {
return (
<SwiftUIStoreViewView style={styles.container} productIDs={productIDs} />
);
}
view raw App.tsx hosted with ❤ by GitHub

Now, you can build the app showing a fully featured paywall screen—all with just a few lines of SwiftUI code!
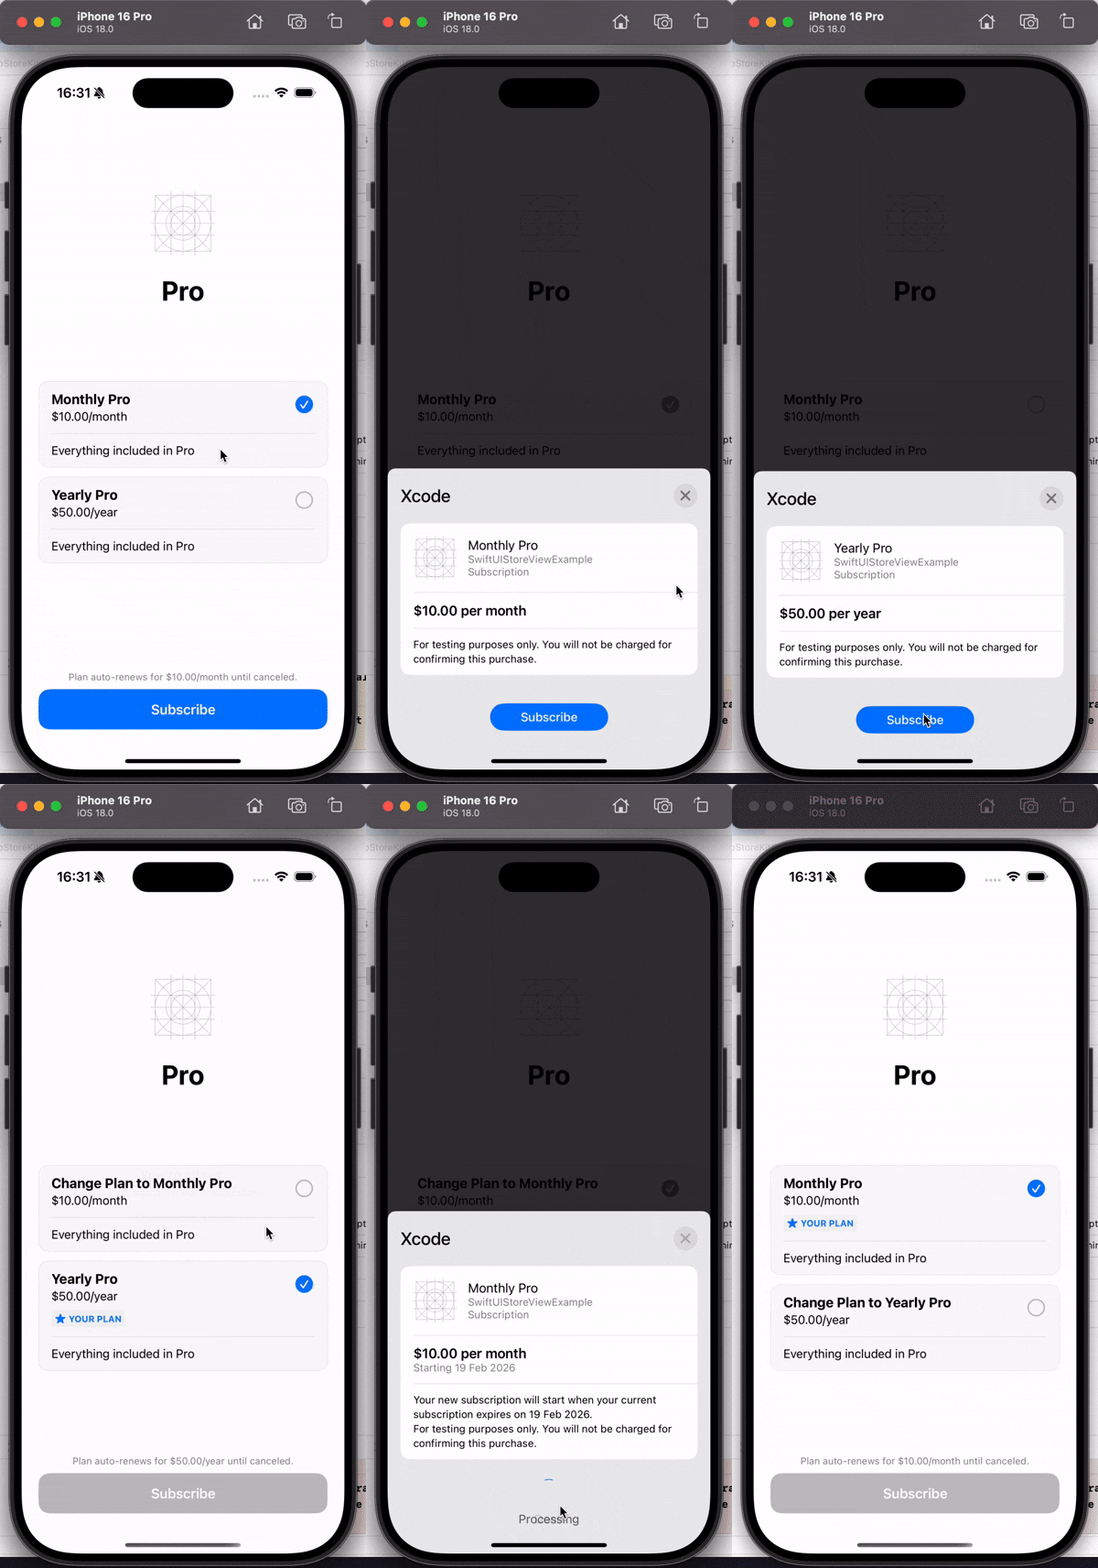
Working paywall implemented with SwiftUI

Congratulations, you’ve just implemented a SwiftUI view that works on both React Native architectures! It’s impressive what SwiftUI can achieve. To play around with bridging SwiftUI and React Native, check out this repo.

Thanks for reading!

Insights

Learn more about iOS

cover

Nov 25Article

Integrating Swift Package Manager With React Native Libraries

Learn how to use Swift Package Manager with React Native libraries, including support for both remote and local SPM packages. This guide explains the spm_dependency helper, monorepo workflows, and current limitations.

cover

Oct 23Live Stream

Building Real-Time Live Activities in Expo

Learn how to add real-time LiveActivity updates to your Expo app using Swift native modules. In this stream, we implemented Apple’s Live Activities with Evan Bacon’s library, explored ActivityKit, and discussed cross-platform development with Solito 5 and Expo UI.

cover

Sep 11Article

How to Use Liquid Glass in React Native

Learn how to bring Apple’s new Liquid Glass design material into your React Native apps. This guide covers design best practices, performance tips, and examples using LiquidGlassView and LiquidGlassContainerView.

cover

Jan 16Article

Solving Swift Modular Header Issues in React Native for Good

Learn how to resolve Swift modular header errors in React Native. Explore solutions like static frameworks and a custom CocoaPods plugin.

cover

Jun 3Article

Handling Multiple Native iOS Views in React Native

In this article Piotr Trocki, software developer at Callstack, explains how to handle multiple Native iOS views in React Native.

cover

Nov 16Article

React Native Meets iPhoneX

Check this practical guide on adapting your React Native application to the new iPhone X, specifically when using react-native-navigation.

cover

Mar 19Tutorial

The Hard Way vs. The React Native AI SDK Way: Stop Writing Custom Modules for Every Model

Learn how React Native AI uses a unified provider model to switch between cloud and on-device LLMs without rewriting application logic, enabling reliable AI experiences online and offline.

cover

Mar 12Tutorial

Build Smarter Apps: Tool Calling & AI Orchestration Explained

Learn how on-device models in React Native can call tools, interact with external APIs, and return structured outputs you can use directly in application logic.

cover

Mar 5Tutorial

MLC LLM + React Native: On-Device AI Without the Pain

Learn how to run third-party on-device LLMs in React Native using MLC LLM. Choose your models, run them efficiently across platforms, and keep a unified JavaScript API with React Native AI.

cover

Feb 24Tutorial

Intelligent Fallbacks with Apple Intelligence in React Native

Learn how to use Apple’s built-in Foundation Models in React Native apps, reduce memory usage, and enable fast, fully on-device AI with React Native AI Apple.

cover

Feb 10Tutorial

What Is the React Native AI SDK? A Complete Intro & Quickstart

Learn why on-device AI matters for React Native apps, how local LLMs behave offline, and what problems React Native AI is designed to solve from day one.

cover

Jan 29Tutorial

Implementing an Android TurboModule with Kotlin

Learn how to implement a React Native TurboModule on Android, from the TypeScript spec and Codegen to the Kotlin implementation and package registration.

cover

Jan 19Tutorial

Working with Different Threads in Swift TurboModules

Learn how JavaScript, native module, background, and main threads interact in React Native TurboModules, and how to use GCD queues to run async work safely in Swift.

cover

Jan 9Tutorial

How to Add Type-Safe Constants to Swift TurboModules

Learn how to expose typed, immutable constants from a Swift TurboModule using Codegen, and get full end-to-end type safety between native and JavaScript.

cover

Dec 30Tutorial

Adding Event Emitters to Your TurboModule in Swift

Learn how to emit native events from a Swift TurboModule and subscribe to them in JavaScript, including proper memory management and Codegen integration.

cover

Dec 22Tutorial

Writing Your First TurboModule in Swift

Learn how to build a fully working TurboModule in Swift, integrate it with Codegen, and bridge it through Objective‑C inside an Expo app.