
Multi-Window React Native Apps With the Meta VR Layout SDK
Authors

Meta Quest gives you room to rethink how an app is laid out. A user can keep a video in view and follow the chat in a separate window beside it, with both parts working together as one app.
Our Horizon OS showcase demonstrated how familiar React Native components and libraries run on Meta Quest. By default, that app runs as a flat panel. Previously, displaying video and chat meant building a split layout inside one window or opening a separate Android activity for the second panel. For React Native, the second activity meant a separate React root. Props and context did not flow between the panels, so keeping them in sync was up to you.
At Meta Connect 2026, Meta released the Meta VR Layout SDK with React Native support. You can now split your interface across windows while keeping it in one React tree. The second window becomes a component, and props and context from the main screen still reach it. You decide which part of the UI should have its own panel, and the system handles spatial placement when available.
In this article, I walk through a companion-panel demo where a counter updates across both windows. I set up the SDK, open the second panel, and show how the app handles cases where the system cannot place it.
How Meta VR Layout SDK Works
The SDK boils down to two things. First, you put SpatialSceneProvider once around the spatial part of the app. Then, you wrap any subtree that should be able to become its own panel in SpatialWindow, and the system decides whether to promote it.
Your app stays a plain 2D app on Meta VR. Meta calls this a Standard Android app. It is not immersive, so it can sit next to other open apps, and you don't need the Spatial SDK or its entity component system for any of this.
When the system promotes the window to its own panel, the app does not split into two. The main panel and the new one are still one React tree. You can keep state in a parent component and pass it to both panels, or use your existing shared store. Props and context reach the window like any other component because it sits in the same tree.
If the system has no panel to give you, the window falls back. Inline is the default, and it does what you'd expect. The content just shows up where you put the SpatialWindow, as a normal part of the main panel. You can also set the fallback to drop, and then the content is not rendered at all.
In the next section, I’ll explain when each fallback makes sense, so bear with me.
What you need to keep in mind before writing the code
Horizon OS manages the available space and determines the final placement of spatial windows. A window may not receive a separate panel because of the device’s system version or a lack of available capacity, so you need to plan its layout and fallback behavior carefully.
Before writing the code, keep these five rules in mind. They cover the limits on spatial windows and the fallback choices that keep your app usable:
- System v207 or later. On older versions, no window will be promoted. Each window uses its configured fallback, which is inline by default. Builds running on phones without spatial window support follow the same fallback behavior, so you don’t need a platform check around
SpatialWindow. - Two slots for React Native. The current React Native integration can promote up to two additional spatial windows alongside the main panel.
- No nesting. A
SpatialWindowinside anotherSpatialWindowis never promoted. It just renders through its own fallback. - Priorities. When there are more windows than slots,
prioritydecides who gets one. The default is 0, fractions get rounded, higher wins, and mount order breaks ties. A window that loses its slot to a higher priority drops to its fallback and waits for a free one. - Fallback inline or drop. Inline keeps the content where you declared it, so nothing disappears. Drop renders nothing until the window gets a panel, so use it for things you can live without, like hints.
Have an inline layout ready so the content remains usable when a separate panel is unavailable.

Configuration
You need React Native 0.85 or later and React 18.2 or later. The SDK works in bare projects and in Expo projects that keep their generated Android files. There is no Expo config plugin.
Install both packages:
npm install @metavr/layout-compat @metavr/layout-window-compatIn the Expo project, rebuild the application after installation. Skip --clean if you have already edited the android directory, because it regenerates it.
npx expo prebuild
npx expo run:android --variant questDebug
In the bare project, you declare the native part from Meta's Maven repository.
// android/app/build.gradle
dependencies {
    implementation(platform("com.meta.metavrx:metavrx-bom:1.2026.0.0"))
    implementation("com.meta.metavrx.layout:layout-react-compat")
    implementation("com.meta.metavrx.layout:layout-window-react-compat")
}
Creating a second panel
Before the code, a word about placements, because the demo shows them on screen.
Every window has a placement, and you can read it with useSpatialWindowState. There are four values:
spatialmeans the window got its own panel,pendingmeans the system is still deciding,inlinemeans the content is shown in the main panel, where you declared the window; you also getinlinebefore the first report from the system comes indroppedmeans the content is not rendered at all.
The last two come from the fallback prop. With inline, the default, the user always sees the content. It either sits in its own panel or in the main one. With drop, the user sees the content only when the window has a panel. If there is no panel, nothing shows up, and the placement reads dropped. In short, drop means the content is simply not shown. I use it for things the app can live without, like a hint or a tooltip, and keep inline for anything the user actually needs.
The demo below shows a counter shared between the main screen and a companion panel. Clicking “Open second panel” displays the companion content in its own window when spatial placement is available.
Watch what happens when I click “Tap +1” on the main screen: both counters update. Clicking “Reset” in the companion panel returns both to zero. The placement label shows whether the companion content has its own window or is rendered inline.
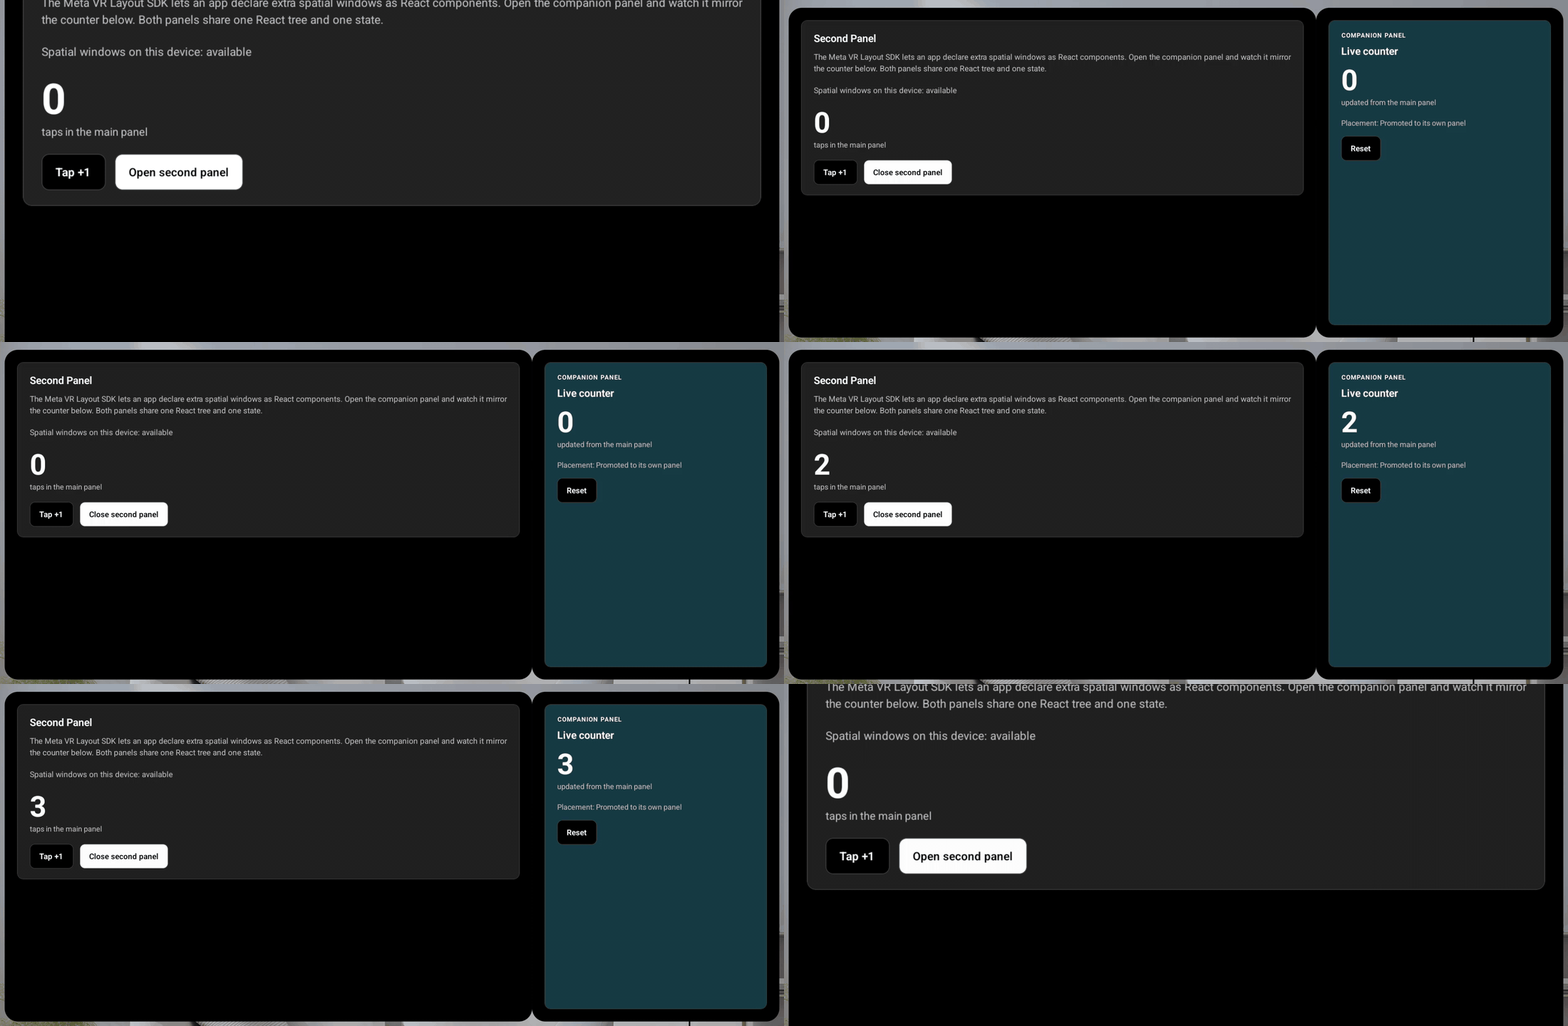
First, wrap the application in SpatialSceneProvider. In the demo, it sits close to the root, inside the existing providers, so that every screen can declare windows.
// App.tsx
import { GestureHandlerRootView } from 'react-native-gesture-handler';
import { SafeAreaProvider } from 'react-native-safe-area-context';
import { SpatialSceneProvider } from '@metavr/layout-compat';
import { createWindowScene } from '@metavr/layout-window-compat';
import { AppNavigator } from './src/navigation/AppNavigator';

const windowScene = createWindowScene({ fallback: 'inline' });

const App = () => (
  <GestureHandlerRootView>
    <SafeAreaProvider>
      <SpatialSceneProvider initializer={windowScene}>
        <AppNavigator />
      </SpatialSceneProvider>
    </SafeAreaProvider>
  </GestureHandlerRootView>
);

export default App;
createWindowScene sets the default fallback for all windows in the scene. You create it once, outside the component, so that the provider always gets the same object. The screen renders SpatialWindow only when the panel is to be open.
// src/screens/SecondPanelScreen.tsx
import { useState } from 'react';
import { ScrollView } from 'react-native';
import {
  SpatialWindow,
  useSpatialWindowState,
} from '@metavr/layout-window-compat';
import { ActionButton } from '@/components/ActionButton';
import { CompanionPanel } from '@/components/CompanionPanel';
import { Counter } from '@/components/Counter';

const WINDOW_LABEL = 'companion';

export const SecondPanelScreen = () => {
  const { placement } = useSpatialWindowState(WINDOW_LABEL);
  const [isPanelOpen, setIsPanelOpen] = useState(false);
  const [taps, setTaps] = useState(0);

  return (
    <ScrollView>
      <Counter value={taps} />
      <ActionButton label="Tap +1" onPress={() => setTaps(t => t + 1)} />
      <ActionButton
        label={isPanelOpen ? 'Close second panel' : 'Open second panel'}
        onPress={() => setIsPanelOpen(open => !open)}
      />

      {isPanelOpen && (
        <SpatialWindow
          label={WINDOW_LABEL}
          windowWidth={480}
          windowHeight="100%"
          anchor="end"
        >
          <CompanionPanel
            taps={taps}
            placement={placement}
            onReset={() => setTaps(0)}
          />
        </SpatialWindow>
      )}
    </ScrollView>
  );
};
The second panel is a standard component. It gets the counter, the placement status, and a callback.
// src/components/CompanionPanel.tsx
import { StyleSheet, View } from 'react-native';
import type { SpatialWindowPlacement } from '@metavr/layout-window-compat';
import { ActionButton } from '@/components/ActionButton';
import { RNText } from '@/components/RNText';

type Props = {
  taps: number;
  placement: SpatialWindowPlacement;
  onReset: () => void;
};

const PLACEMENT_LABEL: Record<SpatialWindowPlacement, string> = {
  inline: 'Rendered inline',
  spatial: 'Promoted to its own panel',
  pending: 'Waiting for the system to place it',
  dropped: 'Dropped (fallback)',
};

export const CompanionPanel = ({ taps, placement, onReset }: Props) => (
  <View style={styles.root}>
    <RNText style={styles.title}>Live counter</RNText>
    <RNText style={styles.counter}>{taps}</RNText>
    <RNText>Placement: {PLACEMENT_LABEL[placement]}</RNText>
    <ActionButton label="Reset" onPress={onReset} />
  </View>
);

const styles = StyleSheet.create({
  root: { padding: 24, gap: 12 },
  title: { fontSize: 20, fontWeight: '600' },
  counter: { fontSize: 56, fontWeight: '700' },
});
Opening and closing is the usual conditional rendering. You mount the SpatialWindow and the system gets a panel request. You remove it, and the panel disappears.
State is just regular React state. taps lives in useState on the main screen and is passed to the second panel as a prop. "Tap +1" on the main panel re-renders the second panel. "Reset" on the second panel changes the state of the main screen. Both panels are visible separately, but they belong to the same React tree.
The window has a fixed label. label identifies the window for the system and connects it to useSpatialWindowState. Meta recommends that label does not change throughout the life of the window. You can treat it like a key in React, but it is not one. It identifies the window on the native side, and two mounted windows with the same label share one placement state.
You call useSpatialWindowState outside of the window, but still under SpatialSceneProvider. In the demo, the placement is displayed in the second panel, so you immediately see what the system has done.
With the drop fallback, you can show your own replacement when the window is not placed. Remember that placement !== 'spatial' is also true at the start and while the placement is pending.
const { placement } = useSpatialWindowState('details');

return (
  <View style={{ flexDirection: 'row' }}>
    <MainContent />
    {placement !== 'spatial' && <DetailsFallback />}
    <SpatialWindow
      label="details"
      fallback="drop"
      windowWidth={320}
      windowHeight={480}
    >
      <DetailsPanel />
    </SpatialWindow>
  </View>
);
Window positioning: anchors and offsets
In the demo, the companion panel sits beside the main window. You can request a different arrangement by changing its size, anchors, and offsets.
windowWidth and windowHeight are required. You give them in React Native layout points or as a percentage of the main window, for example "100%". The location is described by anchors. You choose a point on the parent window and a point on the spatial window. The shortcut anchor="end" pins the panel to the end edge of the main window, which is the right edge in LTR and the left edge in RTL. The lack of an anchor centers the window on the parent window. Full control is given by the pair { parent, child } and offset.
import { OffsetNear, SpatialWindow } from '@metavr/layout-window-compat';

<SpatialWindow
  label="tools"
  windowWidth={320}
  windowHeight={480}
  anchor={{ parent: 'end', child: 'start' }}
  offset={{ z: OffsetNear }}
>
  <ToolsPanel />
</SpatialWindow>
Offsets are levels from -5 to 5, not pixels. OffsetNear equals 1, and positive z points toward the user.
Anchors and offsets describe your intended layout. Horizon OS determines the final placement within the available space, so exact positions and automatic collision avoidance are not guaranteed.
Testing without a headset
You don't need a headset for most tests. Meta Spatial Simulator displays the application as a panel on your computer, and the rest is done by Meta VR CLI. The metavr command starts the simulator, sees connected devices, and collects logs.
npx metavr@latest init
metavr tools install spatialsim
metavr ssim start
metavr doesn't build the app. First, you build the APK, then you install it. The questDebug variant comes from the quest product flavor configured in the project.
npx expo run:android --variant questDebug
metavr app install android/app/build/outputs/apk/quest/debug/app-quest-debug.apk
metavr app launch com.example.secondpanel
metavr capture screenshot -o app.png
In the simulator, you can check window creation, slot limit, fallback, sizes, and anchors. The simulator approximates spatial positioning in 2D. Before shipping, test on a headset to check depth, comfort, performance, and final appearance.

Wrapping up
Previously, using a second Android activity meant managing a separate React root and synchronizing the panels yourself. With the Meta VR Layout SDK, the second panel becomes a component in the React Native tree you already have. You wrap content in SpatialWindow, and Horizon OS can display it in a separate window when spatial placement is available. In the counter demo, both panels stay in sync because they receive state from the same parent component.
You still need to plan for cases where that separate window is unavailable. Keep essential content usable through an inline layout, and use drop for content the app can safely omit. You request the window’s size and position, while Horizon OS manages its placement within the available space.
If you want to try it, clone the demo from our react-native-horizonos-example repository, run npx metavr@latest init, and start Meta Spatial Simulator. You can begin testing on a laptop, then use a headset to check depth, comfort, performance, and final appearance before shipping.
For React Native developers, this opens up more ways to arrange an interface using familiar component and state patterns. A video can stay in view while its chat occupies a separate panel, with both parts connected through the same React tree.


